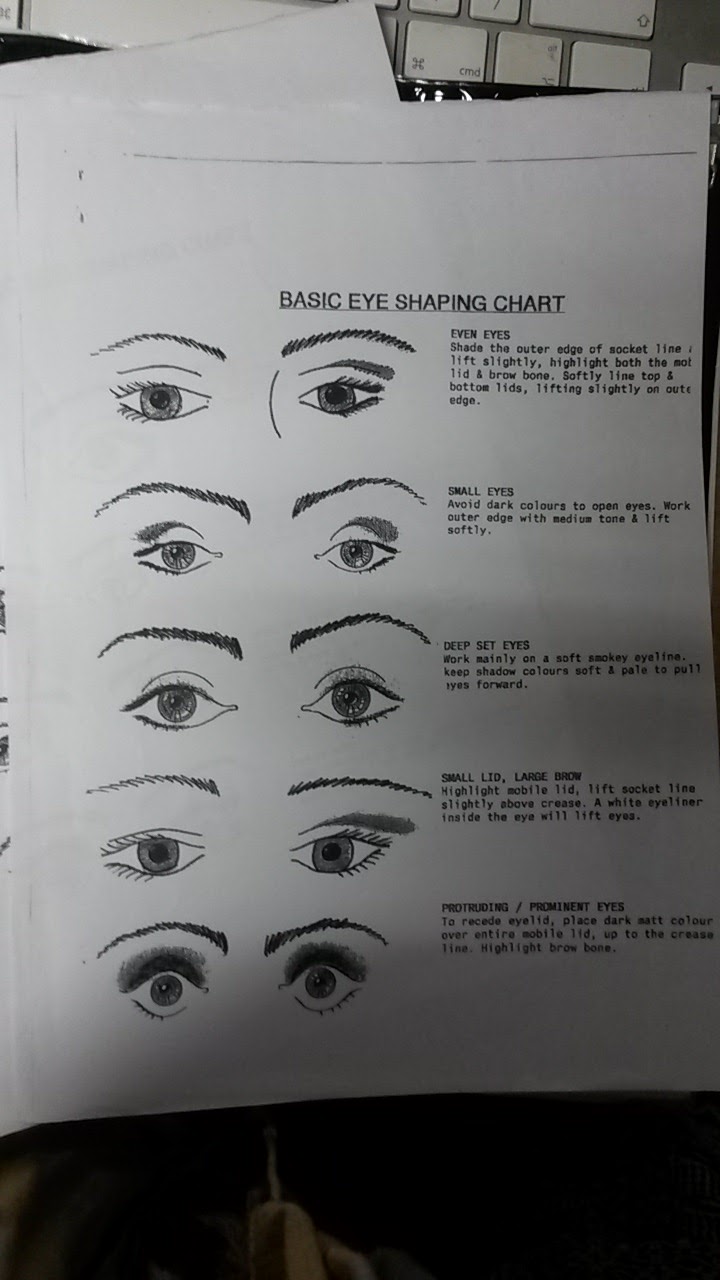
Showing posts with label Reflection. Show all posts

Monday, 14 December 2015

Peer Review


Peer Review

I was happy with my design my partner carried out, it was exactly as I expected with great base and blending of the products, he listened to what I wanted and did it step by step to create the best look possible.

He struggled slightly with the heart but he overcame this well to perfect it, he had great determination and I was overall satisfied. 
He had great attention to detail when carrying out my design as well.
He gave me his design, it looked good, it was clear, even though I couldn’t read certain products he’d used, although any question I asked he answer me immediately. I was happy with the way we both bounced off each other for advice and our structure during the whole project.

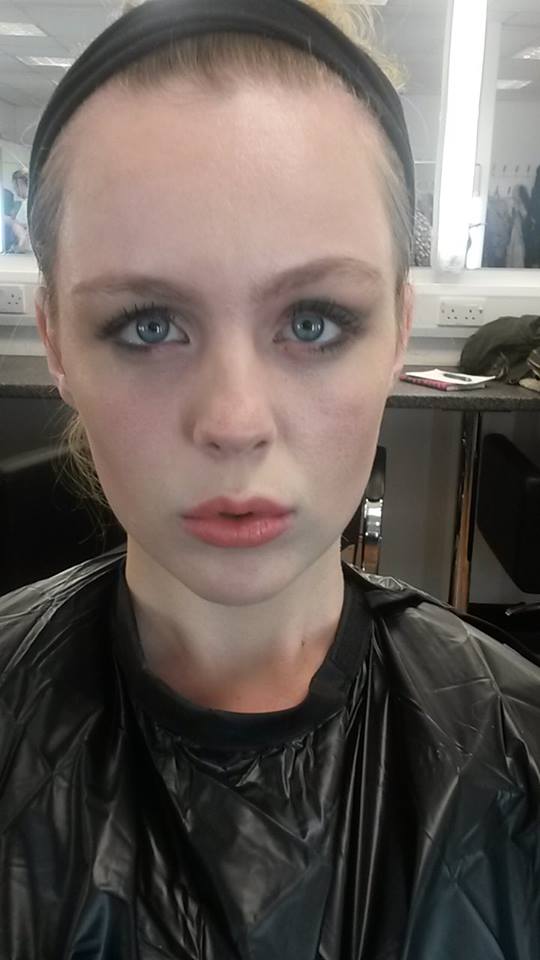
 I like how he kept with the Elizabethan design with the pale complexion and rosey cheeks but made it modern and quirky with the use of the orange combined.

However, he did change his face chart at the last minute which threw me off, with the detailed eyebrows and slight gold underneath. I feel changing his design at the last minute was due to lack of planning, however it came together well and he was pleased.


Overall, we had great communication, we worked well together and understood each other’s designs. The best part was his concentration and his attention to detailing and how he overcame his mistakes along the way. 

Sunday, 13 December 2015

Photographs showing off my personality

Photographs of my personality!

A few photographs reflecting my personality and love for things. It shows my love for my dogs, they are a huge part of my life, I am a huge animal lover so I made sure they were in my photos. Everything that is going on in these photos seem so chaotic, but I had to include everything I loved to do. I made sure I was outside when we did the photos, as I love the outdoors, I involved my bike, as this represented my love for travel and the outdoors also.

I have my gymnastic medals dangling from my bike, as this is also a big part of my life and my biggest success in my life, which reflects my passion and love for the sport.

I lived in and loved Australia so I had to put the flag on the seat of my bike, along with the card at the front of the bike that says 'The world is your oyster' and the compass around my wrist, this also shows my love of travel. I wore black and dark make-up, with the use of bold eyes, as I am at heart in love with rock music and the alternative scene, this was also reinforced with my fake leather jacket and satin tight trousers and Dt. Martins; it also describes me as a person, I am quiet mad, loud and love to be my own kind of person.

I also placed my Vivienne Westwood bag on my bike as I am in love with her designs and bags, even though I love the life of carefree travelling I also love my bit of glam. I am lastly wearing a white flower in my hair which was from Japan, I put this in for my love of Japan and have a Vietnamese bamboo hat on to mark my life in vietnam for a month travelling and working.


Thursday, 10 December 2015

Feeling under pressure


So much worry...
I had a one to one with Sharon, I was so worried about time management and trying to complete all my uni work on time with having a job as well, as I've been having problems getting my student loan sorted as it's been delayed, therefore I have had no choice but to work. 
Sharon was super nice as always and she was so reassuring that I could do it, so she got me to write down what was missing and giving me great advice. 
Why was I so worried? It's all about setting myself goals and achieving them and also making sure I work on time management in future.
I was freaking ouy before I saw Sharon but now I feel reassured and it gave me a boost to get my butt into gear.
Lets do this!


Tuesday, 8 December 2015

Reflection & Evaluation


Evaluation & Reflection

During our project I feel I have developed my skills, with experimenting more with different techniques and products. I enjoyed carrying out my partners design, it was something I had ever done before and I accomplished the challenge.

I had previously never worked on a male and seeing how the design came together made me happy and confident; this was because of the practice and communication between myself and my partner. I believe this all reflected in the final images.

The thing I struggled with was getting an all over even blend of product as there were a couple slightly faint patches where I could of used more product; I felt my strength was the lips and the heavy contour on the jaw line, defining these two went well and also covering the facial hair with orange product evenly.

If I did this design again I would have been more precise with the base with coverage and the detailed work on the eyebrow work, although this was the first I heard of the detailing.

To do this again I would have used a smaller brush to give clear definition, I would of been able to plan ahead if I didn't receive the changes at the last minute from my partner, however, this was overcame but I was a little disappointed with the precision of these at the end of the eyebrows. 

Overall, I enjoyed the challenge and the project because of learning of the new skills and the history behind it; I also was happy with both assessments and felt we were both given clear instructions and made me satisfied that my partner was happy with his final design I create; and lastly the overall looks, looked great.


The final images of the assessment
My Partners final design created by myself

Make-up Artist: Natalie Hodgkins
Model: Toby Oldfield


Side view

Make-up Artist: Natalie Allana Hodgkins
Model: Toby Oldfield


Side View

Make-up Artist: Natalie Allana Hodgkins
Model: Toby Oldfield


My Final Design designed by myself and created by my partner

Make-up Artist: Toby Oldfield
Model: Natalie Allana Hodgkins


Front close up shot

Make-up Artist: Toby Oldfield
Model: Natalie Allana Hodgkins


Angled shot of my design

Make-up Artist: Toby Oldfield
Model: Natalie Allana Hodgkins


Side angle of my final design


My Final Design practice


My final design Practice

My final design chart and step by step guide for myself and my partner to follow.
I practiced the design out on myself to see if it worked well with the use of products, I was very happy with the outcome of my practice of my design.


Products used:

  • Matte Primer by Illamasqua 
  • White base Illamasqua foundation
  • Blusher palette by Kryolan dark brown
  • Supra Color white by Kryolan
  • Obsidian eye shadow 
  • Metalliac eye palette by Illamasqua 
  • Loose powder by illamasqua 

Front shot of practice of my final design


Assessment: Partners design created by myself


Formal Make-up Assessment: Partners design created by myself 


This was my partners final design face chart I followed during practice and the final timed assessment, it showed me what products to use and where, he also on the day gave me a step by step guide on how to achieve his desired look, which I found very helpful in order to give me structure and guidance to complete the look.


Myself and my partner had great communication between one another and I got to practice a number of times in order to perfect his design look designed for his face. I especially enjoyed using the wand to put in the orange supra color throughout the beard, mustache and eye brows, I had never done this before but got the technique of this mastered. 
I was pleased I was put with a male partner as this was a challenge in itself, it pushed to the boundaries and I have never applied make-up on a male, I was nervous at first but got in the swing of things and felt very comfortable working with him on this project.
My partner however, did change his design slightly with the use of curling the corners of the brows to give it more character, which I did slightly struggle with because of being given the design in a small amount of time to practice it in.
However, I felt I accomplished this and worked well under this pressure to work to my designers needs.
He wanted a bright, vibrant design and I enjoyed making this design on him, I struggled slightly with the accuracy of the curled sides of the eye brows, however, I worked well with being patient and redoing until it was created.


Front shot of my partners final design created by myself in the assessment


A moody, fierce look of my partners final design created by myself


Eyes closed shot of the design


Side view of the final look


The other side shot of the final design created


Another image of a side view


And a load more of the final creation in assessment 

Assessment: My design created by my partner


Assessment: My Design created by my partner 

My final design face chart and this created and designed to my face, this was carried out in assessment by my partner and the images are below of the final outcome.


Front view of the make-up application that I designed


Side view of the finish design 


Another close up shot of the design 


Another side view 


A 3/4 angle of my design 


Consultation forms


Consultation forms of all the models I used

These are the models I used throughout my project and I made sure I carried out a consultation with each of 5 models I used.
This was carried out before each time I used a new model, to assess their skin type, condition and if they have any contraindications. This is so I am able to adapt certain products to suit their needs.


Monday, 7 December 2015

The Perfect Eyes and Lips


Creating the perfect Eyes and Lips

This week we went over how to compliment different eye shapes with different techniques and colours also to compliment and bring out the colour in the eyes. First we were given a chart to follow by to determine what kind of eyes our model has, I found this interesting to really enable myself to make my models eye pop and to really emphasise her eyes.


My partners eye colouring & shape:
  • Blue in colour
  • Deep set and wide
  • I used techniques and positioning of products creating a design to compliment my models eye shape 
  • I followed the task sheet for guidance on how to enhance my models eyes as much as possible

The Task Sheet, knowing your models eye shape...


Task sheets photograph

The practical of the perfect Eyes & Lips

Products used:
  • Kryolan cream foundation 
  • Derma color concealer palette
  • Blusher palette by Kryolan
  • M.A.C eye shadow palette 
  • Rouge lip palette by Kryolan 
  • Soap and Glory 'Thick & Fast' mascara 


Angles of the eye design and lips created by M.A.C and Kryolan products

What I did and how I did it to create the perfect Eyes & Lips
  • I used my flat eye shadow brush across the lids with a nude beige colour to give a lighter base to build on
  • I then used my rounded brush to into the crease of the lids with a medium toned brown and worked it outwards to create a smokey graduated effect to the corner of the eyes to enhance them slightly
  • I then built this up with a much darker shade and concentrated on rounded and dragging to the corners of the eyes giving the eyes a smokey effect 
  • I blended this all well and brushing any excess product away 
  • I enhanced the look by using Soap and Glory 'Thick & Fast' mascara, giving the eyes enhancement, finishing off the look.
  • For the lips I used a neutral pink tone from the kryolan rouge lip palette which gave her lips a lovely glossy look, I made them very nude and natural for an everyday look


I created a smokey eye blended to the outer sides of her eye lids to really enhance those deep set eyes, working a light beige colour for the base then using darker browns and working them outwards, making the eyes pop and become very enhanced.

When it came to carrying out the eye make-up, I found it challenging balancing up the two eyes and making them even with the eye shadows and making them enhanced. I found it slightly difficult with the dark shade of brown and making it winged at the sides and making them even also. 
For next time I would use not as much product and be more precise with my brush when applying the product to the eyelids and to practice on different eye shapes to improve my skills further.


For the lips I used a neutral pink tone from the Kryolan palette, giving the lips great structure and with a glossy finish making them really pop but in a natural way.


A few more images of our practical and trying out techniques to enhance our partners eye shape


Overall, I was pleased with the outcome on my first practice using these products, my look on my partner looked fierce and complimented her eyes and lips.


A fierce look with the smokey winged eye created with M.A.C eye palette


Side angle of the make-up creation